

Hybrid Face Mask Pattern (Free Template + Tutorial)


2 Hybrid Face Masks. The floral fabric mask is facing right side up and the 3D shape is visible. The striped fabric mask is show wrong side up with the flap visible.
For everyone who's been following me on Instagram, you know I have been talking about, thinking about, and making fabric masks for a while since the pandemic started. Earlier this month, I started thinking about the next design I was going to try. But I slowly came to the realisation that I will probably never end up with the face mask pattern that will truly fit my face the way I want it to. So, I got to work and started developing my own design. Today, I'm really excited to share this free Hybrid Fabric Mask pattern and photo tutorial with everyone!
Download the Hybrid Face Mask Pattern
Design considerations

Hybrid Face Mask shown standing with the wrong side up. The main fabric is a floral print, the lining is a small check print and the nose flap is the same floral print as the main fabric.
Instead of trying out new patterns, I decided to work with what I know from the patterns I have tried and everything I have learnt so far.

Gwen is wearing her Hybrid Face Mask with the head tilted down to show the flap that rests on the nose and prevents the mask from sliding down during wear.
While working on the various prototypes for this face mask, I kept these considerations in mind:
(not in order of importance)
Maximum comfort during wear
Most ease of sewing
Minimum fabric waste
I really still like the look of the cup/mould style like the one by Craft Passion and Dhurata Davies. However, through my experience with a similar design by Made My Lemonade, I knew the problem of the mask sliding down my face will continue to persist.. unless a design change is made.
The 3D mask by Romilda has been a great alternative design. While I have sung endless praises for it, there is ONE thing that I don't like about the design...
When it comes to washing, I dump all my masks in the washing machine. The 3D mask is designed to close flat at rest. Because of this, I'm not sure how much washing gets into the insides of the mask, where my face touches. This has always bugged me at the back of my head.

And so, I knew I had to take matters to my own hand and start designing my own pattern. After about 7 prototypes, this is the hybrid face mask pattern I am most happy about.
The Hybrid Face Mask pattern

This face mask pattern is called the Hybrid Face Mask because it is a combination of key characteristics of the 2 designs I have worked with:
clean, moulded look inspired by the original cup mask by Craft Passion / Mimi G / Made My Lemonade / Dhurata Davies
fitted flap inspired by the 3D mask by Romilda
DOWNLOAD THE HYBRID FACE MASK PATTERN TEMPLATE
***Please print the pattern at 100% scale and check against square gauge***
Mask Size
The final measurement of the Hybrid Face Mask is approx. 19cm long and 13cm wide. This is the measurement you get when you use a 2/8" seam allowance when sewing the mask in Step 5. If you are using a 1/8" seam allowance in Step 5, you will end up with a slightly bigger mask.
To size up or size down, I recommend using the slash method. Cut the pattern length-wise in half, and then width-wise in 3 parts.

To size down, overlap the cut edges. To size up, spread the pieces. Unless you are changing the size radically (e.g., making for a preschooler), I strongly suggest just making small changes. Remember to lengthen and shorten the nose flap accordingly! For example, if you are using the guide below to size up the mask, use a nose flap that is 8cm by 21 cm.

I am planning on making the Hybrid Face Mask for my husband as well and will be spreading the cut edges by 1cm. He is in the US at the moment, so I won't know how it will fit him until ~6 weeks later when it gets to him, haha.
General Sewing Tips
Before we get into how to sew the Hybrid Fabric Mask pattern, I want to address some general sewing tips to help you have a stress-free sewing experience.
I sew using a home sewing machine - a secondhand Husqvarna Viking E20. Sewing with multiple layers and a small seam allowance can be a little tricky for a home sewing machine.
These are some settings and machine set-up that is recommended based on my experience:
Use heavy duty needles OR needles labeled for sewing jeans
Maintain a stitch length of approx. 25mm OR at at setting 3
Use regular sewing machine foot
A very small seam allowance of 1/8" to 2/8" is used for this pattern. The reason for this is to reduce bulk in the masks and the need to pick up a pair of scissors to cut off the excess bulk. I know we all want efficiency when it comes to sewing masks for our family and friends! If you are a confident sewist, try to use the smaller end of this seam allowance.
Backstitching and pressing with an iron are not necessary for every single step of sewing. The steps where these are recommended are highlighted.
Watch the full video tutorial on how to sew the Hybrid Face Mask pattern
Cutting the fabric

Open-face with 2 layers of fabric underneath
There are 2 ways to cut the fabric using the Hybrid Face Mask paper pattern - open-face or on the fold. Personally, I like cutting it on the fold because with that, I avoid having to manoeuvre my scissors left and right too many times when cutting the darts out.
How To Sew The Hybrid Face Mask
And now let's get to sewing! The Hybrid Face Mask is made up of 2 main parts: the mask body and the flap. The use of an elastic casing is an alternative design that is also covered in this tutorial.
If you have sewn the masks mentioned above, then the steps for sewing this Hybrid Fabric Mask pattern shouldn't look too complex. Here's how to do it:
Step 1
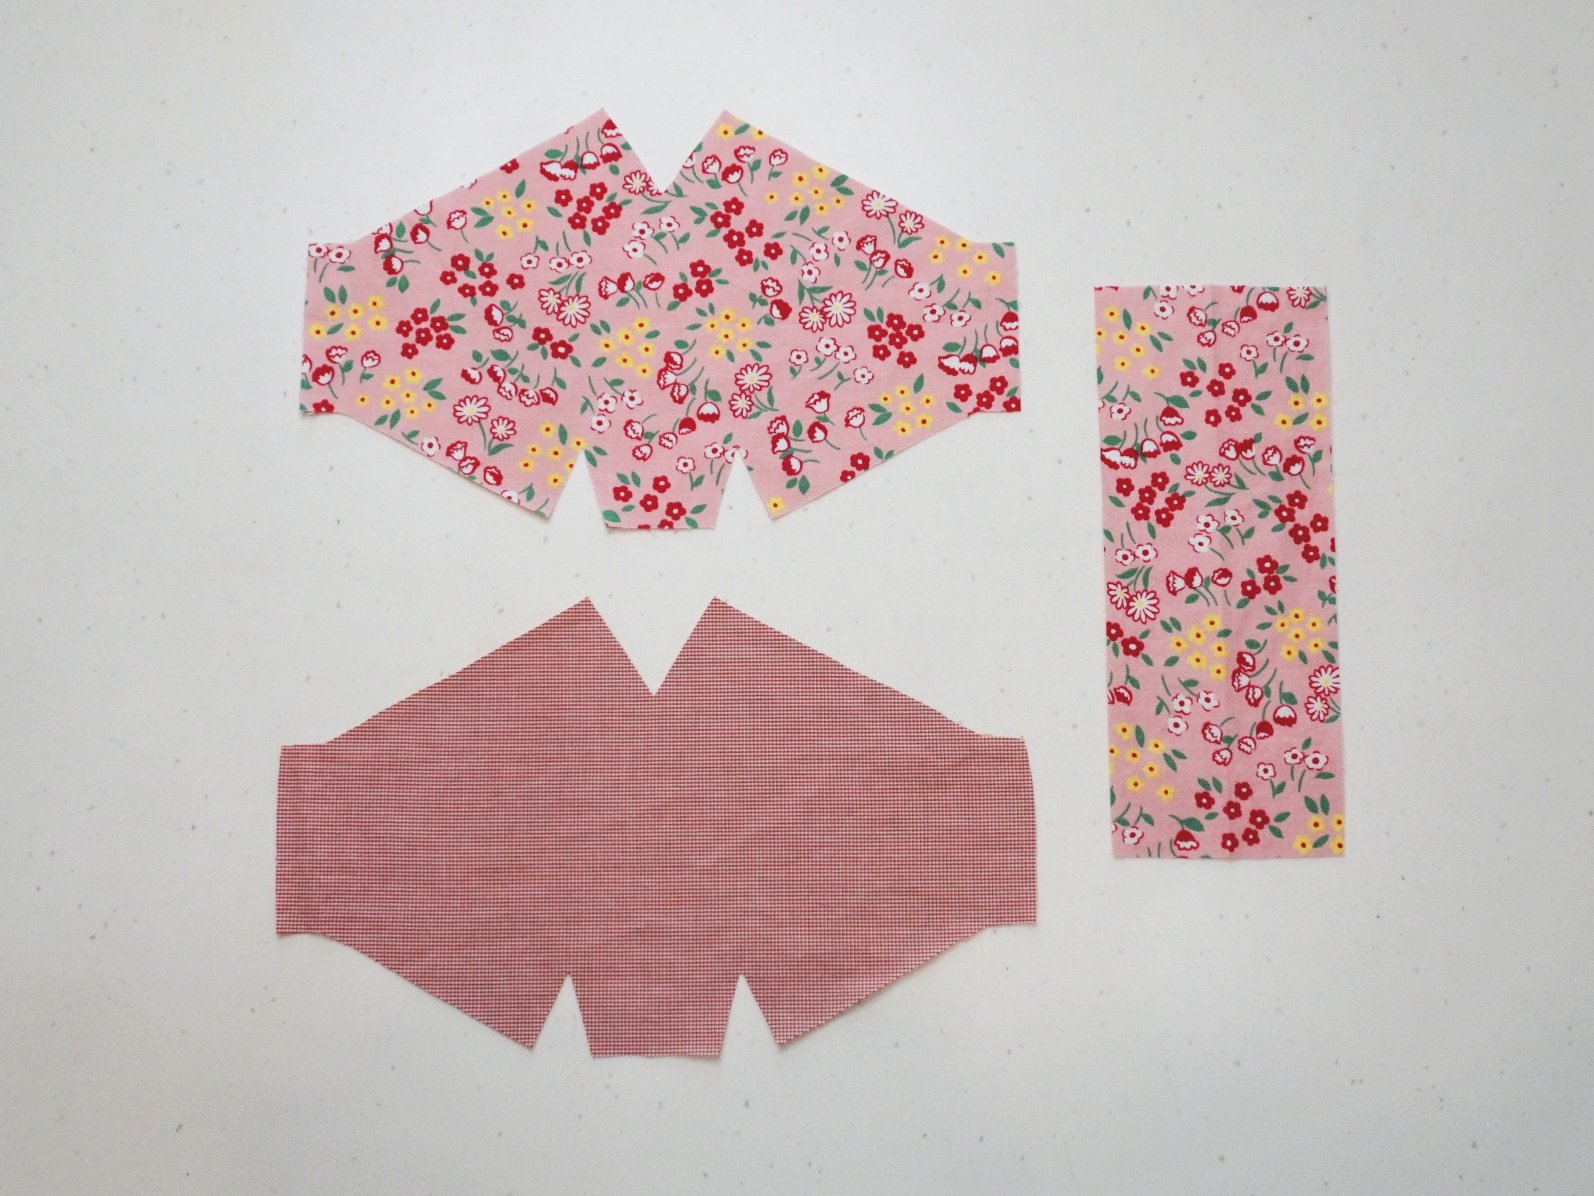
Using the pattern template, cut the body of the Hybrid Face Mask. Cut 1 for main body and cut 1 for the lining.
Using a ruler, measure and cut a 8cm by 20cm rectangle.
You can use different prints and/or fabric for the main piece, the lining, and the flap for a more interesting look!
Step 2


Sew the darts on the main and lining pieces using a 2/8" allowance from the raw edge. Always sew from the outer edge to the pointed end. Leave a long tail of thread and tie a knot to secure the stitches for the dart.
Trim the excess tails after securing the stitches.
Step 3

Fold the flap piece in half lengthwise. Mark out the middle of the flap by cutting a small notch.
Optional: If you want your work to look neater, take the time to press the flap with an iron. Also, press the darts on the main and lining pieces in opposite direction to reduce bulk over the darts when sewing. Most of the time, I just press the darts and flap down with my fingers.
Step 4:
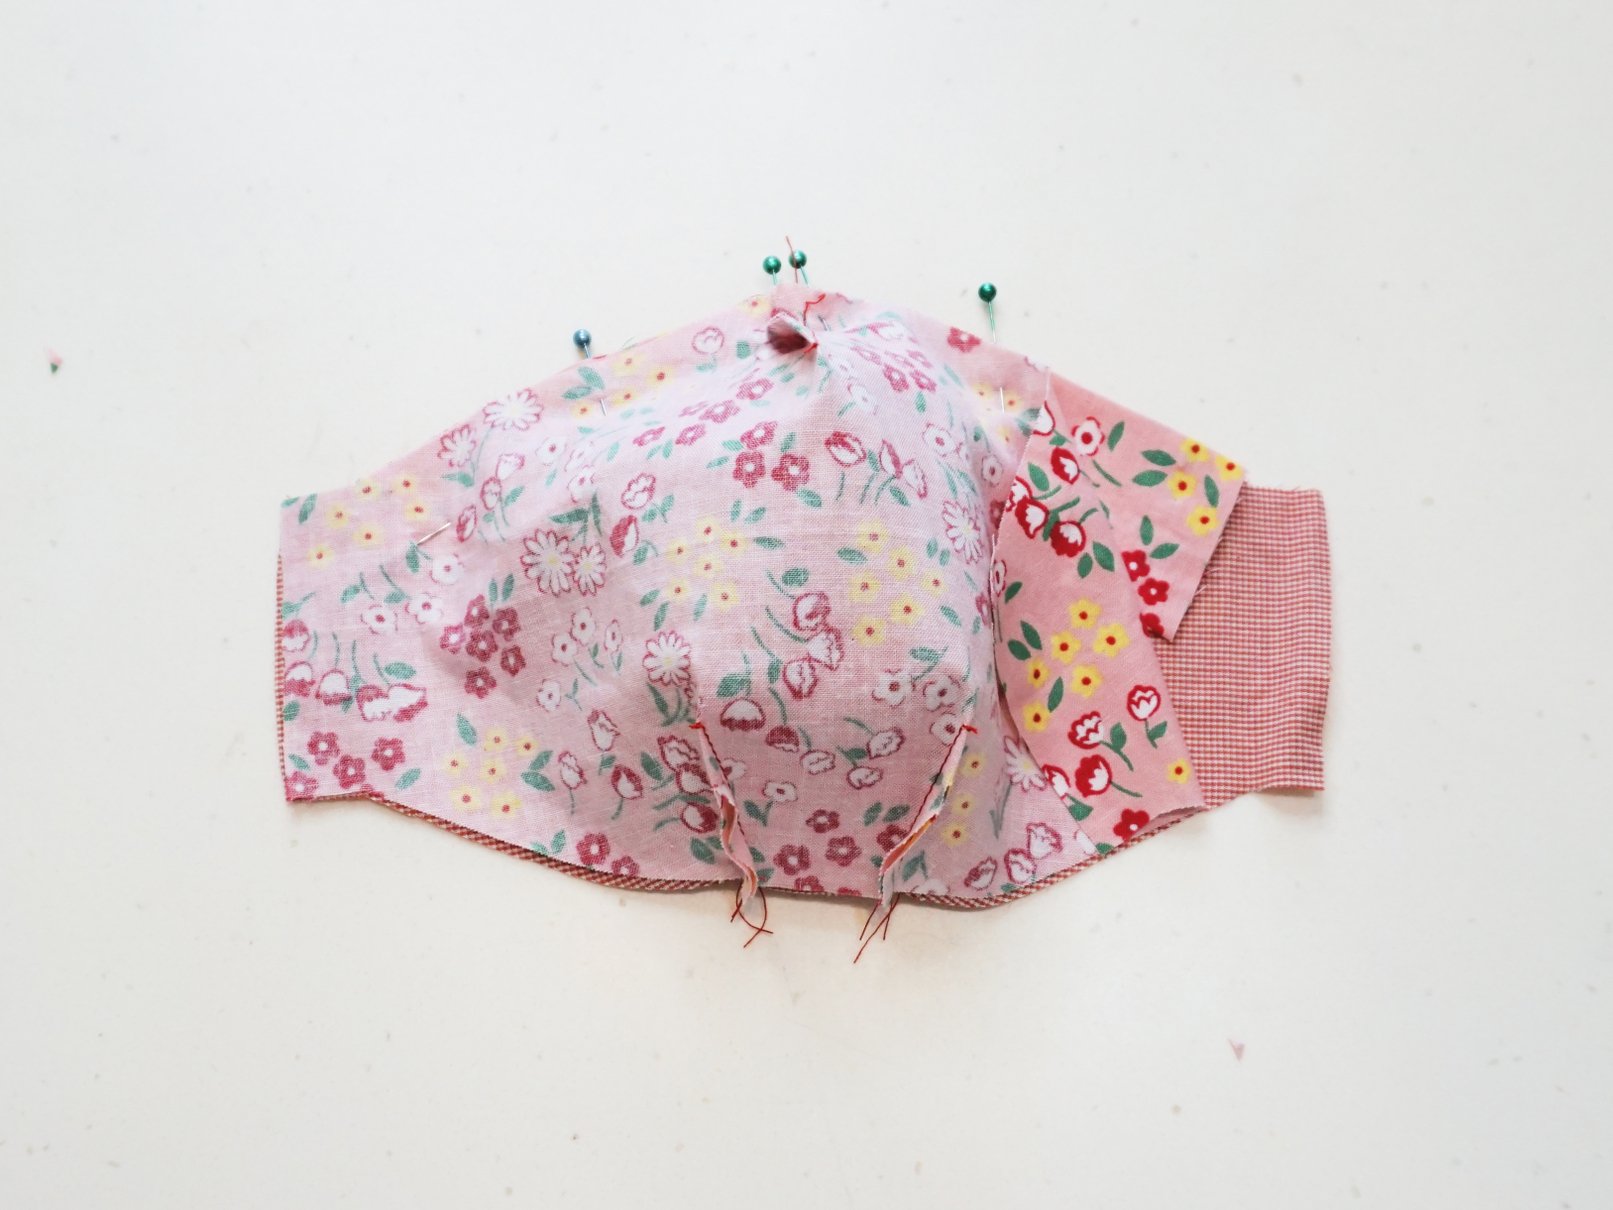
Sandwich the flap between the main and lining pieces. Both the main and lining pieces should have right sides facing each other. Pin the pieces in place.
Make sure that you align the raw edge of the flap along the upper edge (i.e. the edge with 1 dart) of the mask. The centre of the flap should also align with the central dart.
Note: The flap does not go all the way to the short sides of the mask and this is done on purpose.
Step 5:

Sew along the upper edge (i.e. the edge with 1 dart) using a 1/8" to 2/8" allowance.
Backstitching at the start and end of this is recommended so the stitches don't unravel when the mask is turned inside out later.
Step 6:

Repeat Step 5 for the lower edge of the mask (i.e. the edge with 2 darts).
Step 7:

Turn the mask inside out. The small opening may make this a little tricky, but the trick is to pull the flap to get the mask right side out more quickly.
Step 8:

With the mask right side out, pin the flap to the lining side. Make sure that the flap lays flat against the lining of the mask.
Topstitch the upper and lower edges of the mask, approximately 1/8" to 2/8" from the edges.
Tip: The bits with the darts are pretty thick so gently pull your mask along from the back of the presser foot to prevent it from getting stuck and "sewing on the spot".
Step 9
Omitted elastic casing option:
With the flap laying flat against the lining piece, fold the short sides of the mask to create an elastic casing. Fold the short edge by 1cm, then fold the the same edge again by 1.5cm. The flap should be tucked under the fold.
Sew the folded casing in place. The stitch line should be approx. 4/8" from the folded edge of the mask.
Tip: Start and end the stitch line from the upper and lower edges of the mask (or vice versa, depending on which side you are sewing). Backstitch at the start and end of this stitch line so your stitches don't unravel.
Additional elastic casing option:

Using a ruler, measure and cut out 2 rectangles measuring 7cm by 10cm. These pieces are now referred to as the "casing rectangles".
(1) With mask main side and right side of casing rectangle together, sew the casing rectangle to the short edge of the mask, approx. 1/2" from the raw edge.

(2) Turn the mask over, lining side up and fold the casing rectangle out. Wrap the short edges of the casing rectangle around the mask by folding the short edges towards each other, wrong side to wrong side.
(3) Then, fold the free long edge of the casing rectangle to the stitch line, wrong side to wrong side.
(4) Finally, fold the free long edge of the casing rectangle again. Make sure that the raw edge and tip of the flap are now tucked under the casing rectangle.
Sew the casing rectangle in place. Try to have the stitch line as close to the edge as possible to ensure that that flap is sewn under the casing rectangle. My stitch line is about 5/8" from the short edge of the mask.
Backstitching at the start and end of this is recommended so the stitches don't unravel with wash and wear.
Step 10:

Thread your elastic through the elastic casing and tie it according to your preferred tension/length.
Personally, I prefer the around-the-ear design because of its convenience. The elastic can be easily pulled through the casing using a safety pin or a tapestry needle.
If you don't have elastic, you can also make ties by cutting up old T-shirts into long strips.
Enjoy your Hybrid Face Mask!
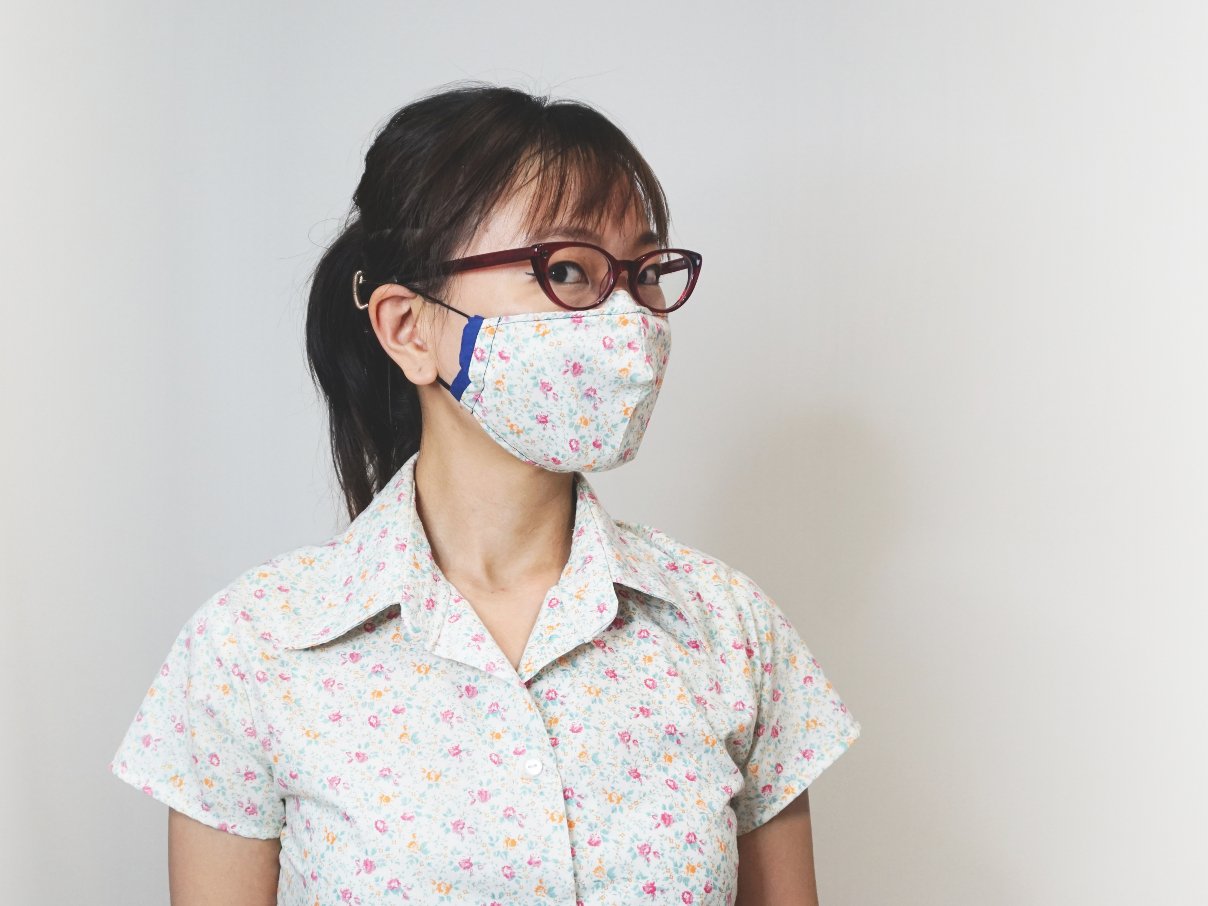
I hope this Hybrid Face Mask works well for you. If you do try this pattern out, don't forget to use the hashtag #GSMHybridFaceMask so everyone can check it out. Let me know what you think about this pattern in the comments below!
Stay well and keep safe x


This work is licensed under a Creative Commons Attribution-NonCommercial 4.0 International License.
If you would like to use my pattern for commercial purposes, kindly contact me via email - gwenstella@gmail.com