

How to Draft A Pleated Bust Bodice using a Basic Sloper


After the successful drafting and completion of my 50's inspired red tropical sundress, I was really inspired to continue drafting more designs through the use of the flat pattern. Today, I am sharing how to draft a pleated bust bodice using a basic sloper with the flat pattern method!
This pleated bust bodice is inspired by a vintage 1950's blue gingham dress that was sold by Sweet Bee Finds. The design features deep pleats on the front of the bust and a band between the underbust and the waist. There are no darts on the front of the bodice, and all shaping of the bust is created by the pleats. It also features a high, round halter neckline.

Curious about how to draft a pleated bust bodice using a basic sloper? Well, pull out your front and back bodice slopers and let's get down to it!
A note on using a basic bodice sloper for flat patternmaking
https://www.instagram.com/p/CPo7uo4MbaE/?utm_source=ig_web_copy_link
Drafting with the flat pattern always starts with the pattern pieces WITHOUT seam allowance. All seam allowances are only added at the end of the drafting process.
If you don't have a basic bodice sloper and would like to get one, check out the following resources:
Tutorial by The Closet Historian: link
Tutorial by Melly Sews: link
Sloper series by Curvy Sewing collective: link
Books by Winifred Aldrich: link to an example from secondhand bookstore Abe.com
Big 4 pattern sloper such as this
I didn't get my sloper through any of the abovementioned methods so I can't specifically recommend any of them. My sloper and my basic knowledge of flat pattern manipulation is from an in-person dressmaking class I took in Singapore years ago. I'll probably go into that in a future blog post.
How to draft a pleated bust bodice using a basic sloper


The pleated bust bodice consists of 5 separate pattern pieces:
Pleated bust
Front band
Back bodice
Front neckline facing
Back neckline facing
Please note that this tutorial does not include drafting instructions for the bottom of the garment! Once you have mastered how to draft this pleated bust bodice using a basic sloper, you can basically add anything to the bottom. Circle skirt, pleated skirt, shorts, mini skirt... the world is your oyster! For this dress, I chose to use a half circle skirt design.
Drafting the pleated bust

Note: If your front bodice sloper comes with shoulder dart and waist dart, start at Step 1. If your front bodice sloper comes with waist dart + bust dart, start at Step 2.

Step 1: Close the shoulder dart and add a bust dart
Trace the front bodice sloper
Mark out the bust height (B.H.). This is the horizontal line going across the bodice sloper that goes over your full bust.
Mark point A on the side seam. This is the point where the bust height line and the side seam meet.
Mark point B on the side seam. The distance between A and B is 1 ¼”.
Draw a line from point B to the apex of the shoulder dart (see red line).
Cut along the red line, ending at B.H. line.
Pivot the shaded area to close the shoulder dart.

Step 2: Establish new neckline, shoulder width, armhole and underbust line
Neckline: Lower neckline by 1cm (3/8")
Shoulder: Shorten shoulder width to 2” from neckline
Armhole: Raise armhole by 1cm (3/8")
Underbust: Draw a horizontal line across bodice to mark underbust (i.e. below the breasts)

Step 3: Close bust dart
Snip towards the apex of previously closed shoulder dart (see red line).
Pivot the shaded piece to close the bust dart.

Step 4: Spread front bodice to create pleats
Snip along previously closed shoulder dart (see red line).
Spread shaded piece to create a distance of 3” between the apex of the previously closed shoulder dart
Step 5: Trace new pleated bust piece.
If your side seam has a pointed edge from the bust dart, correct it by drawing a straight line from the armhole to the bottom of the pattern piece
Fold the paper pattern piece for the desired pleat width and mark out the fold lines for the pleats as appropriate.

Step 6: Mark out fold lines for pleats
The first pleat line should be parallel to the previously closed shoulder dart (see A1)
Pleats should be folded towards the side seam (i.e. A1 to A2, B1 to B2)

Step 7: Make final markings on new pleated bust piece
This pattern piece will be cut on the fold. Cut 1 on fold.
Drafting the front band
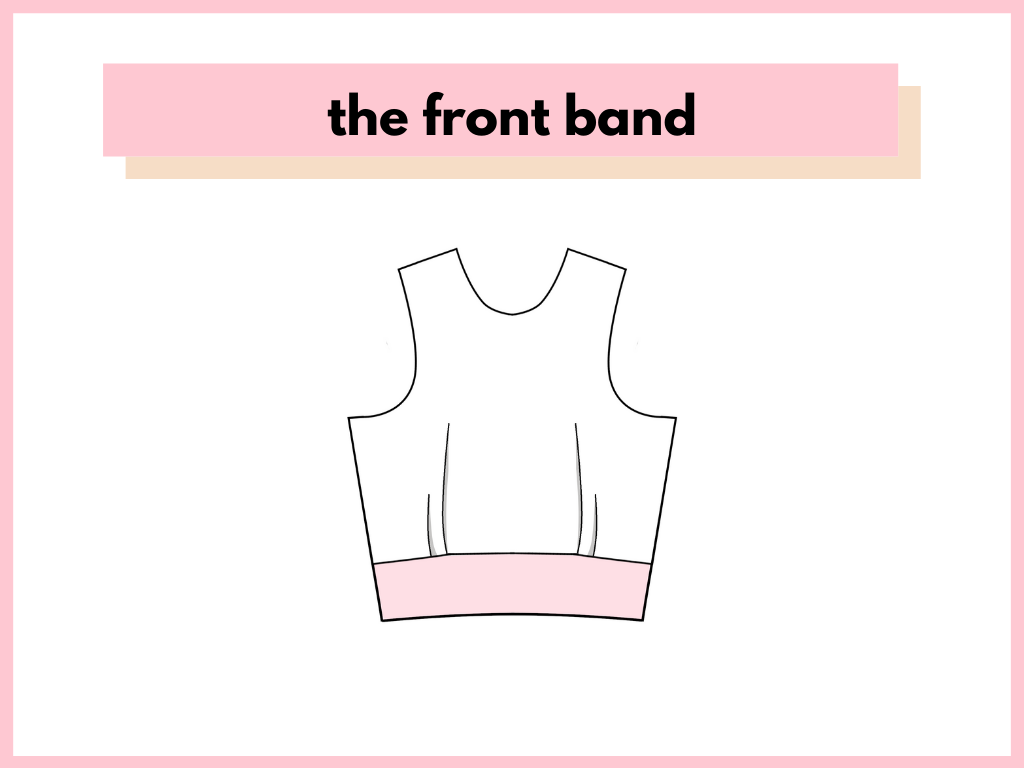

Step 1: Return to Step 2 of pleated bust drafting instructions
Using the underbust line as a guide, trace the area of the front sloper between the underbust and the waistline

Step 2: Close waist dart
Fold the paper pattern to close the waist dart
Ensure that the pattern lays flat

Step 3: Trace the new front band piece
This pattern piece will be cut on the fold. Cut 1 on fold.
Drafting the back bodice


Step 1: Trace your back bodice sloper
Make the following adjustments when tracing the new back bodice:
Adjust the top point of the side seam (i.e. bottom of armsyce) by: (1) moving it towards the centre-back by 1cm, (2) raising it by 1cm
Shorten shoulder to 2”
Re-draw armsyce / armhole with french curve ruler
Note: Shoulder seam should be omitted through the steps above

Step 2: Trace and make markings on new back bodice piece
This pattern piece will be cut as a single. Cut 2 pieces to make the left and right sides.
Add grainline marking parallel to centre-back seam
Checking the side seams
Once all 3 pattern pieces are drafted, line up the pleated bust, front band, and back bodice pieces together to check that the side seams match up.
side seam of pleated bust + side seam of front band = side seam of back bodice
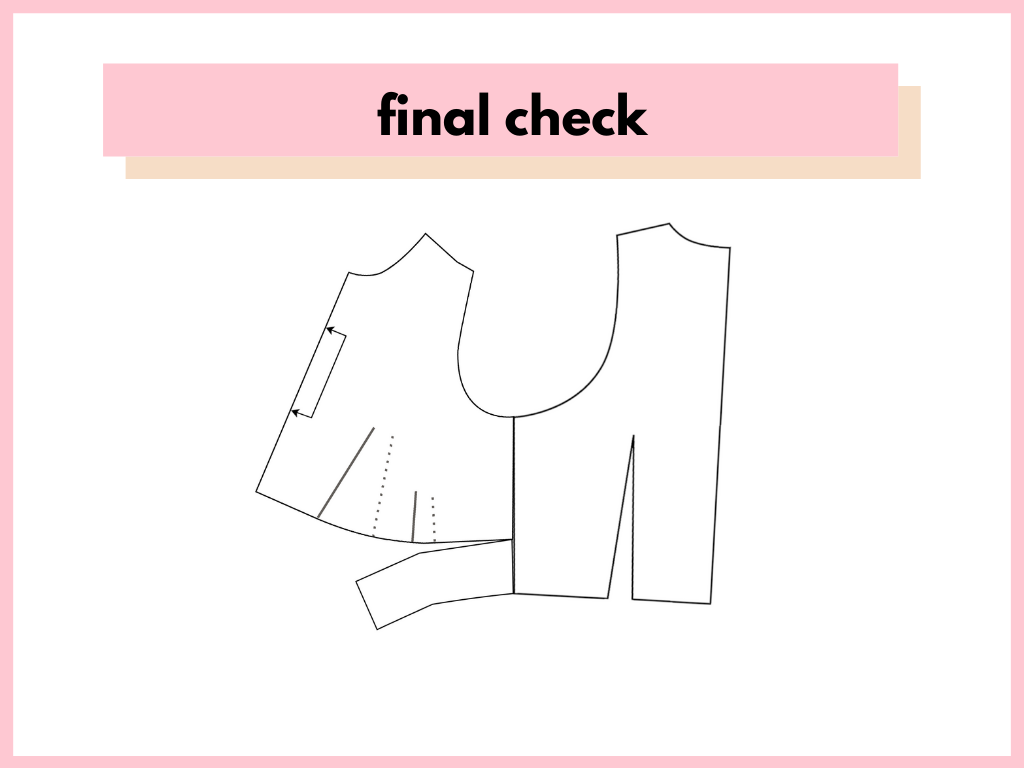
Drafting the facing pieces
The facing pieces for the neckline is drafted from the pattern pieces for the pleated bust and the back bodice pieces. Draft the facing pieces by following the neckline and the shoulder seam. The facing piece should be 1 3/4" wide all around.
The front neckline facing is cut on the fold, just like the pleated bust piece. Similarly, the back neckline facing is cut as a single. Cut 2 pieces for the back neckline facing.
Adding seam allowance
Finally, add seam allowance to all your pattern pieces (i.e. front neckline facing, back neckline, pleated bust, front band, back bodice). Since this is your own pattern, you can choose to use either ⅜” or ⅝” seam allowance. You can even simply lay the cut paper pattern pieces on the fabric and mark the seam allowance directly on the fabric. I used the direct-on-fabric method because I didn’t want to trace the pattern pieces on another piece of paper just to add the seam allowance.
Differences in design between my pleated bust bodice and the original

Left: original vintage 50's blue gingham dress listed by Sweet Bee Finds
Right: my pleated bust bodice in strawberry print
When you compare my version with the original blue gingham version, you will notice the following differences:
Deeper and slanted pleats on the original
Wider front band on the original
These differences are both intentional and non-intentional.
Difference in front band width
I can say from my own experience of fitting and wearing true vintage dresses from the 1950's that I seem to have a shorter torso than the average western women of those times. As a result, the narrower front band for my draft was fully expected. So, don't be worried if you feel that your front band piece looks wider or narrower from mine. As long as you have marked out the underbust line and waistline correctly, you have nothing to worry.
Modifying for deeper and slanted pleats
As someone with smaller breasts and a flat high bust, I was afraid that having deeper and slanted pleats would lead to bagging on the bust piece of the bodice. I literally have nothing to support the fabric under that section! If you would like to experiment with deeper pleats, then I suggest spreading the pleated bust pattern by more than 3" to experiment with how the bodice will look on your body (refer to Step 4 of drafting the pleated bust piece).
I also opted for straighter pleated falling vertically on the bodice for simplicity. If you wish to draft a pleated bust with slanted pleats, make sure your top of the fold lines for the pleats are leaning towards the side seams. You may also need to experiment with the fold lines just to get the right depth and angle of the pleats.
Don't forget to make a muslin to check your design and your fit whenever you make changes to the pattern!
Considerations for fitting a half circle skirt to the pleated bust bodice
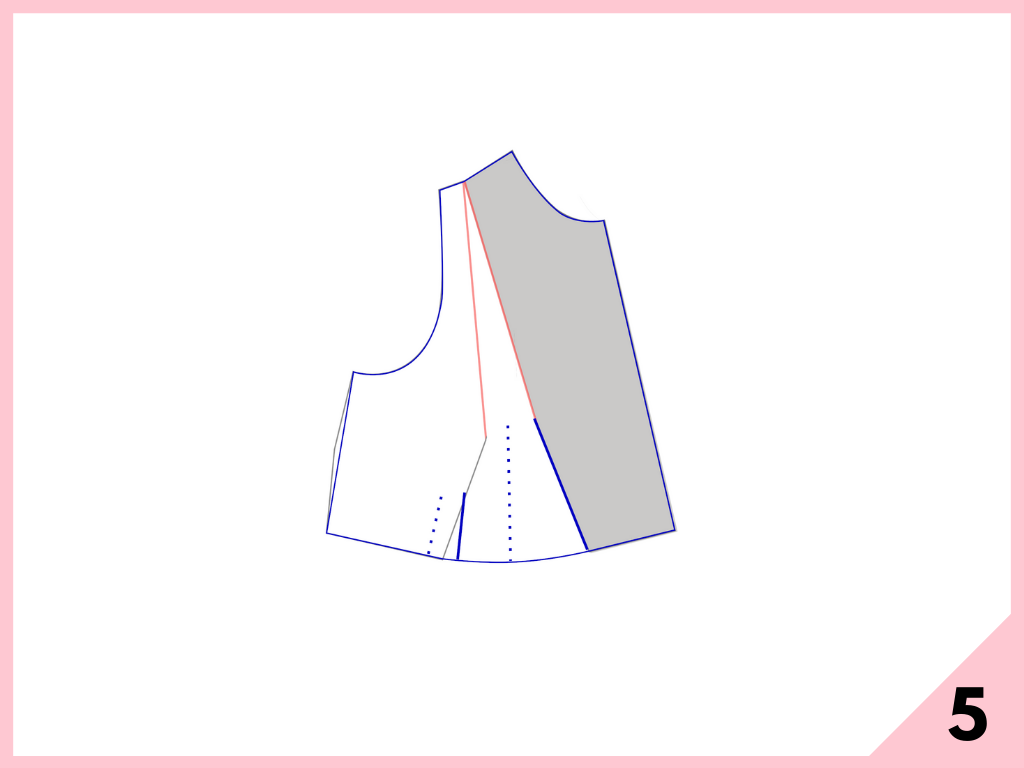
As I mentioned in the video, I had to tackle some fitting issues after putting the bodice and the skirt together. It seems that the bodice needed a curve waistline to fit the curved waistline of the half circle well.
I ended up taking in the side seams from the bottom by 1cm (3/8") and that made a dramatic change to the way the skirt lays on the bodice. See the shaded area in the figure below for reference.

Post-fitting modifications to bodice pattern pieces for half circle skirt design
Sewing the pleated bust bodice
If you want to see how I put everything together, check out my vlog for this sewing project!
Questions about drafting a pleated bust bodice using a basic sloper?
Leave a comment below and ask away! If there's anything in particular about flat patternmaking that you would like me to share in a future blog post, let me know as well.

