

Why So Small!? (So Sew Easy Bralette Pattern Review)
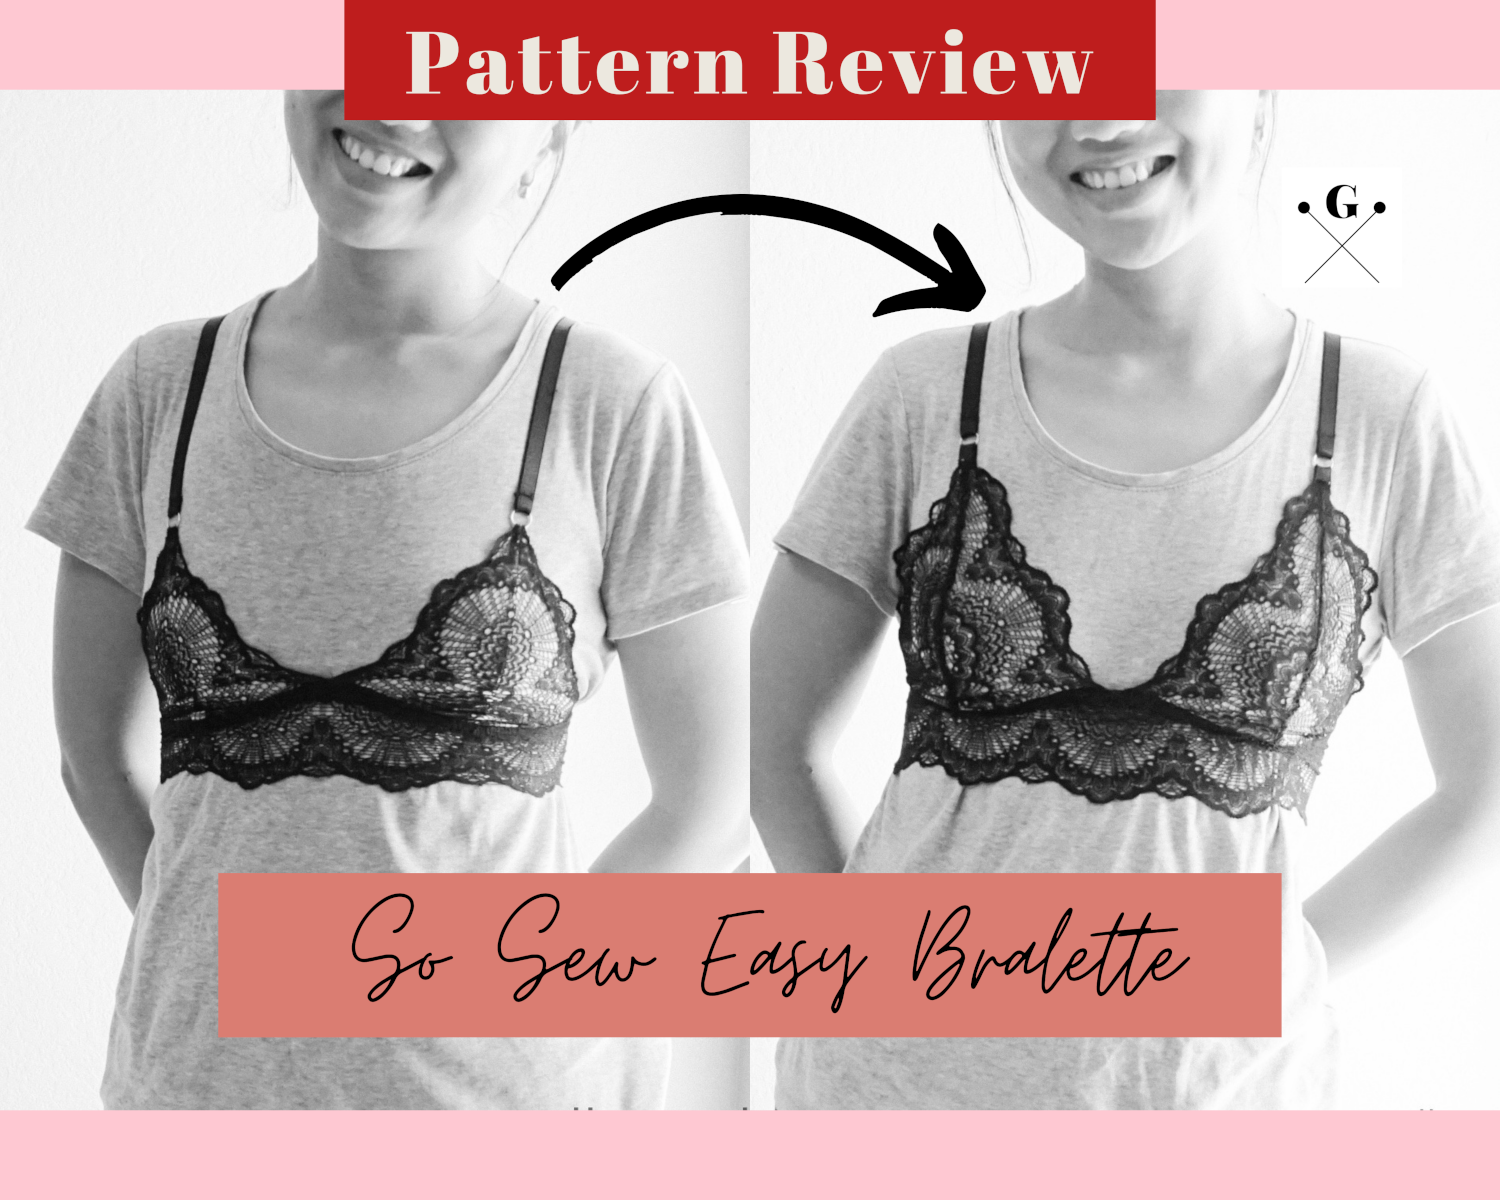

Gwen wearing the So Sew Easy Bralette over a grey t-shirt. It looks too small!
Welcome back to another installation of my lingerie sewing journey! Today, I am sharing my So Sew Easy Bralette pattern review. The So Sew Easy Bralette is a free sewing pattern which I shared in a previous free bra sewing pattern round up post. My first version ended up being... so so small. I'll go through why it might have ended up being so small and the modifications I made to the pattern for a second version.
The So Sew Easy Bralette

The Bralette pattern by So Sew Easy fits 30″-34″(S), 34″-38″(M), 38″-42″(L), 42-44″(XL). It also comes with a photo tutorial on the So Sew Easy blog, as well as a video tutorial on their Youtube channel.
In the blog post, there is also an additional note stating that the pattern may not fit breasts with in cup size C or bigger. Well, guess what, it didn't fit my itty bitty cups for the size I cut as well...
So Sew Easy Bralette pattern review
For reference, my measurements are as follows:
high bust = 31″
full bust = 30.5″
under bust = 26.5″
Based on the size guide provided, I chose to make my first version of the bralette in a size SMALL. Since I am pretty new to sewing lingerie, I dove into sewing the bralette without making any modifications to the pattern.
Why so small?

Alas, the bralette ended up being so so small. The cups were too small, and the band was too narrow. I could barely put the bralette on!
How did it up end being so small?
Did I print the pattern in a smaller scale?
No, I checked the scale using the test square provided and it was correct.
Did I cut the pattern out wrong?
Maybe. In my first version, I lined the straight edge of each pattern piece on the lace border and that might not have been ideal? That said, I don't think it would have caused such a significant change in size and fit!
Did I use the wrong stretch lace?
I don't know. The pattern does not specify the amount of stretch needed for the stretch lace used for this pattern. The stretch lace I used for this pattern has more than 50% stretch and despite that, it was still too small for me.
So... why so small?
That leaves me with 1 possible reason - the pattern.
Other than being too small, I also found that my first version of the bralette fitted too wide. The centre seams of each cup sit on the sides of the nipples, towards my underarm. Basically, this first version could barely cover my nipples.
Overcoming the small fit of the So Sew Easy Bralette
Salvaging the first version of the bralette

I wanted to save the first version of the bralette from being banished to a dark corner of my closet, so I cut the centreback seam of the bralette, and attached a pair bra hooks and eyes I have saved from previous RTW bras on each end. This definitely alleviated the problem of the fit of the band but the teeny weeny cups continue to be a nuisance to me.
Unfortunately, this bralette will only be "used for study purposes".
Making a second version of the bralette
After reflecting on the issues I encountered with first version of the So Sew Easy Bralette, I made modifications to the pattern and gave it another go.
Here's some modifications I made to the second version of the bralette sewing pattern:
Pattern modifications
The side cup
When modifying the pattern, I started with the side cup piece (i.e. the piece closer to the underarms). I extended the length of the straight edge from SMALL to MEDIUM, then adjusted the curve accordingly. I did not change the edge that will be sewn to the band. See grey shaded area in Figure 1 below.

Figure 1: The side cup (image not to scale)
The centrefront cup
Next, I altered the centre front cup piece (i.e. the ones that overlaps in the middle on the front). This one is a little tricky. I wanted to move the seam (i.e. the curved edge) towards the centre front so that it sits on my nipple. Using my first version of my bralette as a guide, I found that the pattern needs to the moved about 1" for the seam to sit on my nipple.
Now, I'm not sure if this is the right way to modify this pattern piece but this is what I did based on my experience with sewing garments and flat patternmaking:
I extended the curve beyond the straight edge by 1" (Fig. 2). Then, I laid the side cup piece and walked the curve seam of the centre front cup piece to make sure that the red curved edge of the centre front cup piece = curved edge of the side cup piece. They weren't at first so I extended the tip of the cup of the centre front piece a little more. The goal is to make sure the curved edges are the same length cause they will be sewn together to make 1 bra cup.
The final shape of the centrefront cup is demonstrated in the grey shaded area in Figure 2 below.

Modifying the So Sew Easy Bralette pattern
Figure 2: The centrefront cup piece (image not scale)
The band
Finally, I extended the length of the band. For my measurement, I used the same curved edge for SMALL but extended the band to the size for MEDIUM. See grey shaded area in Figure 3.

Figure 3: The bralette band (image not to scale)
Cutting modifications
On top of the pattern modifications, I also cut the lace differently for my second version of the So Sew Easy Bralette. I placed the straight edge of the cup pieces ~JUST~ under the lace design. It's not lot of difference but I didn't want to chance it a second time.

Laying the straight edge of the pattern piece right on the edge of the lace border - NOT RECOMMENDED!

Laying the straight edge of the pattern piece just under the lace border
Sewing/construction modifications

Last but not least, I made changes to the construction of the bralette. I felt that having just 1 layer of lace made the bra too flimsy and added a layer of micromesh to give the cups more stability from wash and wear.
To add the micromesh, I cut the bra cup pattern pieces out and sewed the centre front seams (i.e. curved seams) together as usual. then, before sewing the bra cups to the band, I sewed the micromesh layer and the lace layer together, wrong sides together, by sewing tiny zig zag stitches along the edge of the micromesh.

Image showing zig zag stitches securing the micromesh to the lace
My second version of the bralette
And it worked! My pattern modification was a success and I ended up with bra cups that cover my breasts and the centre front seams that go over my nipples!

When placed side by side the difference is really obvious! I'm so glad that I persevered and successfully overcome the So Sew Easy Bralette sewing pattern.

Left image shows the first version of the So Sew Easy Bralette and it appears so so small... right image shows the second version of the bralette and it appears to fit much better!
Sewing the bralette again
Will I sew the So Sew Easy Bralette again? Maybe.
Now that I have the pattern modified, I will be able to make another one of this bralette if I wish. But I am in the process of trying out other free bra sewing patterns so I may or may not return to this pattern.
If I did, I might try the pattern in another material like a jersey knit. A lacy bralette is cute and all but let's face it, it's just not functional. The lace gets snagged on my nails and they just wear out more quickly. Disclaimer: I'm speaking from my experience with high-street RTW lacy bralette.
Do you have a pattern review for the So Sew Easy Bralette?
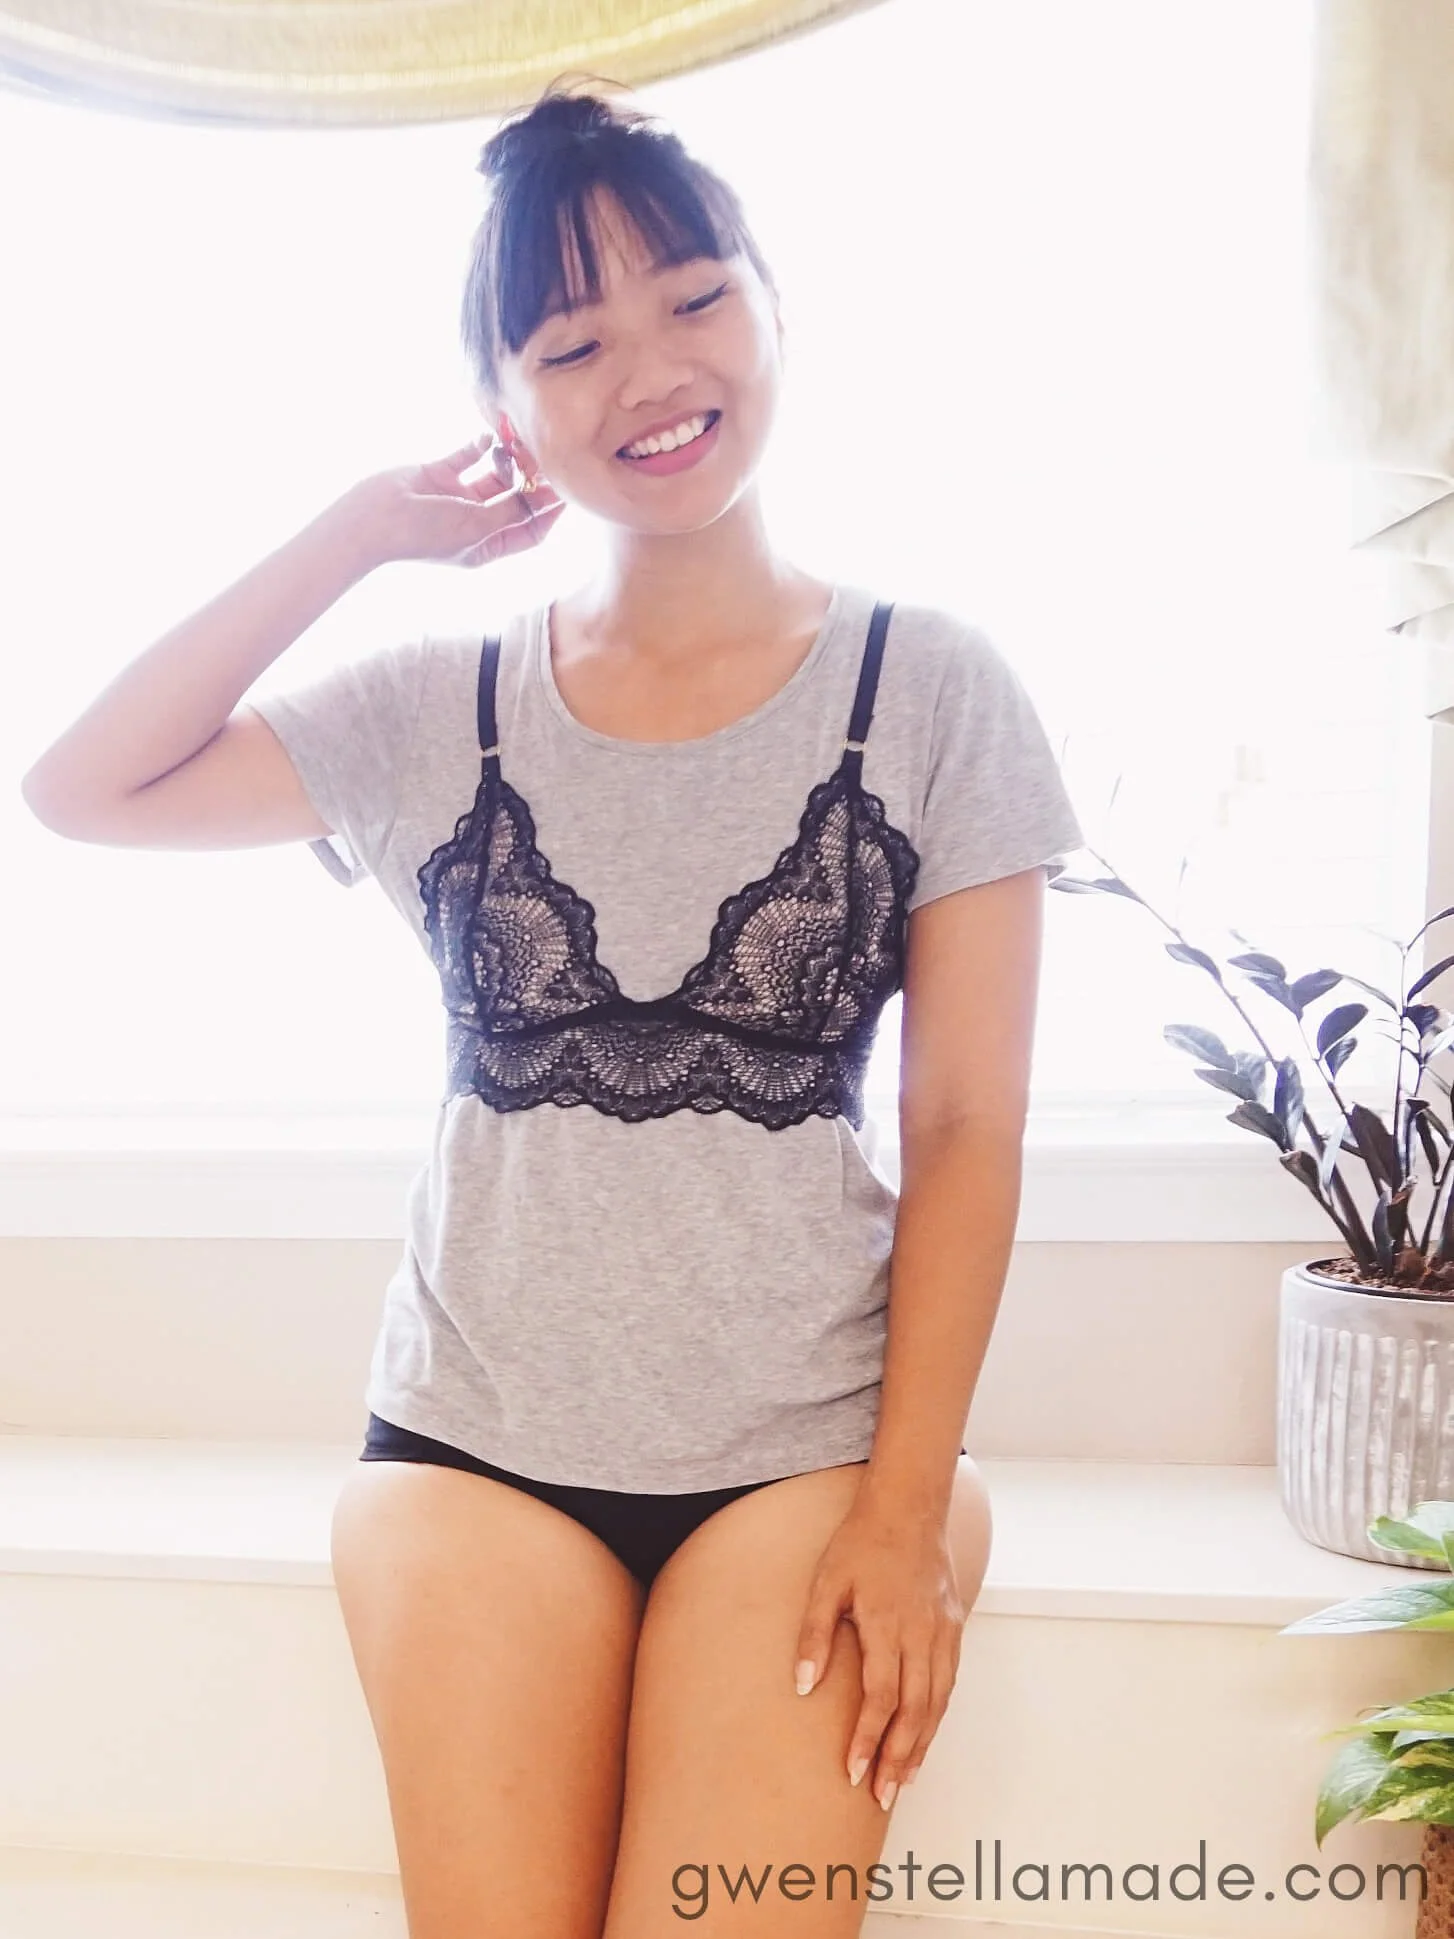

So Sew Easy Bralette Patter Review - Gwen wears the bralette over a grey t-shirt. This second version of the bralette provides more coverage for the breasts and fits better!
Based on other So Sew Easy Bralette pattern reviews (example) and some comments on my Instagram, it seems like most people did not have any issues with the fit of the So Sew Easy Bralette. Is it just too small for a reported "small"? Let me know your review of the So Sew Easy Bralette pattern!