Summer Belle Set (Vintage Dress Refashion)
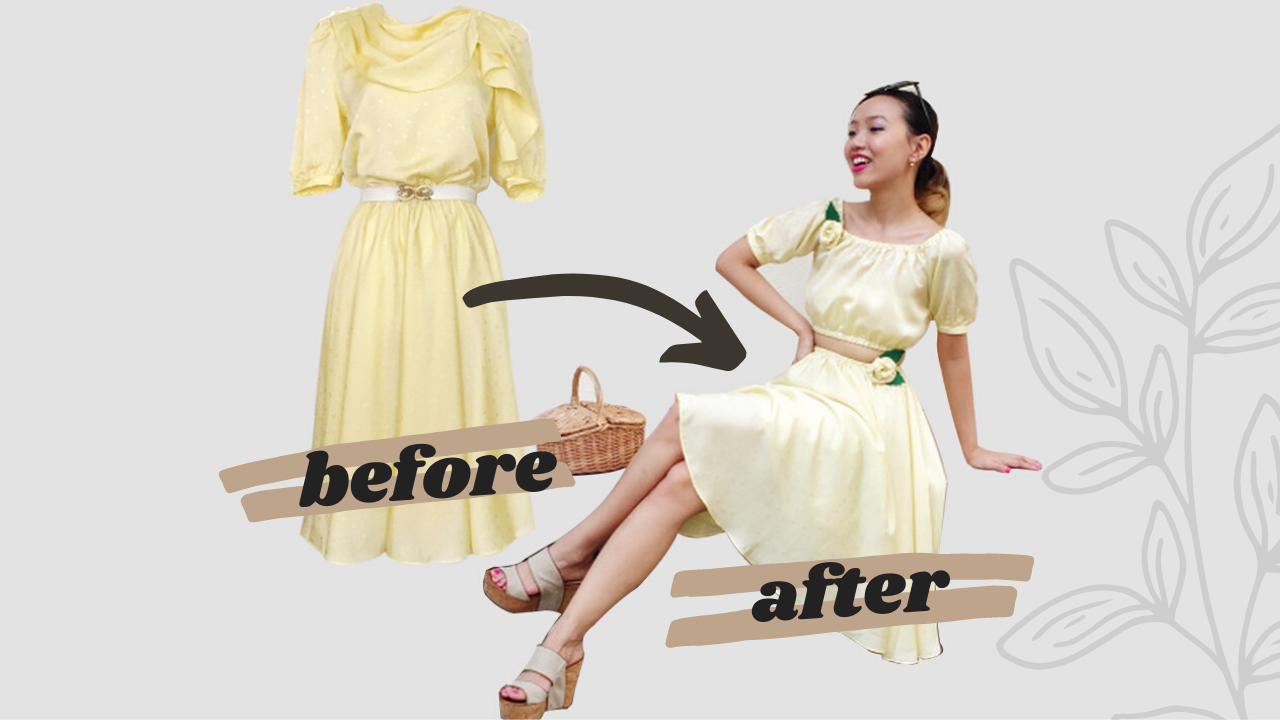
Since August 2018, I have been trying to declutter and downsize the things I own. A big bunch of them are 1970s and 1980s clothes from my early years into vintage and from my previous trips to Hong Kong. I have been trying to sell them at a decent price, but I am also painfully aware of the fact that I may not be able to sell all of them in the timeframe that I have in mind. One of the dresses is this soft yellow vintage 1980's dress, which I ended up refashioning into a 1950's style summer set!

This vintage 1980s dress comes with puffed sleeves and a beautiful circle skirt. I have always been a fan of the sleeves and the skirt, but didn't think the bodice was too great. I made myself a promise - if it didn't sell by the start of February 2019, I would cut it up and make myself something "new" to wear for Chinese New Year.
And yes, it didn't sell.
THE DESIGN
When I decided to cut the dress up, I had a few ideas in my head but no concrete plan for the final design. It's hard to have a very definite plan for a refashioned project because I need to know the amount of fabric I have to work with, and I can really only tell after I have started cutting the pieces up. However, for this project, I was sure that I wanted to work the look around keeping the hemmed circle skirt and the puffed sleeves.

Originally, I thought I would do a shirred back with some shirring elastic I have, but then after cutting the bodice up and removing the lining, I realised it wouldn't make sense to have a shirred bodice and that it would be easier to just make a basic peasant style blouse.
THE BODICE

With the zipper and lining removed, I sewed the back centre-seam together on the machine. Then, I cut the neckline to make a scooped neckline and trimmed the bottom hem of the bodice to straighten it.


After that, I finished the cut edges with a small zig-zag stitch (with moderate tension) for a clean finish. Finally, I folded down along the edges of the neckline and the bottom hem to make a casing for the elastic.

THE SKIRT

The skirt was a pretty easy make. All I had to do was to make an elastic casing around the waist!
THE FINAL LOOK

After completing the bodice and the skirt, there was still the little piece of fabric left from the faux cowl of the original vintage dress. I didn't want to waste that fabric, so I decided to make some roses with them! The leaves of the roses are made with some green felt I had lying in my box of sewing supplies. I sewed some brooch pin on the leaves and then glued the leaves onto the back of the roses. I didn't want to sew the roses directly onto the bodice because I want this blouse + skirt to have a more versatile look (i.e. not just one look).


Making the roses turned out to be such a great decision!


This blouse and skirt set has turned out to be such a great match to my "Pineapple of my Eye" set. Eep, I think I have just expanded a summer capsule wardrobe by accident. I will be mixing and matching my looks with them for the rest of the month, so keep an eye out for the outfits I will be posting on my Instagram (@gwenstella.made).
I hope you've enjoyed looking through the process of this refashioned project. Tell me what you think about this look in the comments section! x Gwen


